At Centrify, an AWS Partner Network (APN) Advanced Technology Partner, we frequently work with developers building applications on Amazon Web Services (AWS). While many aspects of app development and deployment on AWS have been streamlined, authentication of end-users into apps remains challenging.
A traditional approach is to implement your own identity repository using a relational database or directory server. You are responsible for securing and storing user identities, implementing identity lifecycle management functions to create new users, implementing password policies, and recovering lost passwords.
Another option is to use Amazon Cognito, which enables you to add code to your application to authenticate users either directly through a user pool, through a social identity provider, or OpenID Connect (OIDC) identity provider. Amazon Cognito is simpler than developing your own authentication service, but your application is still in the frontline of authentication attacks.
There is, however, a third option that is secure, scalable, and simple to implement. In this post, I will show you a new method of authenticating users into your mobile and web applications using the Application Load Balancer feature of Elastic Load Balancing while leveraging Centrify as an OIDC identity provider.
This approach allows you to shift authentication function to the Application Load Balancer, requires no code changes in your app, and allows you to authenticate users against any connected directory source, including your on-premises user directories.
Getting Started
Using Centrify as an OIDC identity provider enables you to offload the authentication function to the Application Load Balancer. It requires no code changes in your app and allows you to authenticate users against any connected directory source, including your on-premises user directories. In addition, Centrify allows you to have a single identity for users across all your apps with Single Sign-On (SSO).
This approach also lets you specify additional security requirements such as multi-factor authentication (MFA). Learn more about the authentication flow when a user accesses a sample web app deployed behind an Application Load Balancer.
Prerequisites
Before we get into any of the setup, you need to make sure the following prerequisites are ready:
- Create an account with Centrify. You can sign up for Centrify Application Services on AWS Marketplace or request a free trial.
- A sample app deployed on Amazon Elastic Compute Cloud (Amazon EC2). Follow this tutorial to create your own sample application.
- Application Load Balancer configured for the EC2 instance running your application. Follow these instructions to create an Application Load Balancer.
- An HTTPS Listener that points to your application as a target group. Make sure your HTTP requests are forwarded to HTTPS.
Adding OIDC Authentication to Your Application
First, you need to add and configure an OIDC application to your Centrify portal.
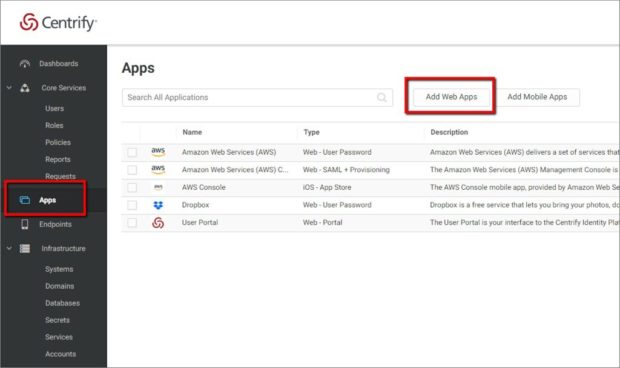
Step 1: As an admin, login to your Centrify console and click on Add Web Apps under the Apps tab.
Step 2: Select the Custom tab and the OpenID Connect option. In the ‘Do you want to add this application?’ pop-up, click yes which will start the Add Application wizard.
Step 3: In the Setting dialogue, change Application ID to the name of your app and add an app Name. For this example, I changed the Application ID to “MySampleApp” and added “My Sample AWS App” in the Name field. You can leave the rest of the settings as default.
Step 4: Head to the Trust tab on the left side of the screen and input information for the Identity Provider Configuration.
Step 5: We’ll start by inputting an OpenID Connect Client Secret, which can be any string of letters, symbols, or numbers. For this example, my secret is “LoadBalancerSecret.”
Step 6: Next, we need to add the URL and URI for the Service Provider Configuration. This allows us to set up the relationship between Centrify and the Application Load Balancer.
Be sure to add http:// in front of the Resource application URL. This URL is the DNS name for the Application Load Balancer, and you can get this information from the AWS Management Console. You will use the same information for the Authorized Redirect URIs.
Please note that you can point your vanity domain name to the Elastic Load Balancer DNS record using a CNAME or Amazon Route 53 alias record. For this example, I added a CNAME for the “stassampleapp.com” URL.
Step 7: Now, we are ready to define the roles that will be able to access our application. I created a sample user directly in the Centrify admin console and added this user to a sample role. Centrify allows you to connect any directory (on-premises or in the cloud) as well as leverage social login for user authentication. The role assignment is input under the User Access section in the Apps tab.
We are now done with the Centrify portion, and all that’s left to do is tell the Application Load Balancer how to process user authentication. As you recall, your application does not have any authentication layer and we never touched the application code. Your Application Load Balancer will now act as an authentication mechanism.
Final Steps
Verify your Application Load Balancer is set up correctly by going to the DNS URL in your browser. If your Load Balancer is set up correctly, your sample app will load. Then create the authentication rule in the AWS Management Console. You can also create this rule using the AWS CLI by following the documentation here.
To create the rule in the console, go to your Amazon EC2 dashboard and select the Load Balancer you created for your app. Click on the Listeners tab, and then View/Edit rules to create our authentication rule. The rule allows you to create an if/then condition. For this example, we’ll instruct the Load Balancer to authenticate using OIDC when end users navigate to our web page.
To get most of the information required, go to your Centrify admin console, then the Trust tab under Apps, and copy the OpenID Metadata URL into your browser. The page that opens up will have all the information you need to move forward.
Once you’re done, click Save and your rule will appear in the Load Balancer rule set.
If you prefer to use AWS Command Line Interface (CLI), the command we’ll be using is:
aws elbv2 create-rule --listener-arn listener-arn --priority 10 \ --conditions Field=path-pattern,Values="/login" --actions file://actions.json
And here is the action’s JSON file for our example:
Now you can go to your application’s URL (don’t forget https://) and you will be redirected to the Centrify login page. Users can now enter their credentials in the Centrify portal and get an instant and secure access to your application.
Additional Resources
Learn more about Centrify solutions and our developer program.
To get started quickly, check out the Centrify Identity Services on AWS Marketplace.
 |
Centrify – APN Partner Spotlight
Centrify is an APN Advanced Technology Partner. With Centrify Application Services, you can secure access to AWS, applications, and your corporate resources with integrated Single Sign-On, Multi-Factor Authentication, and conditional access policies. To learn more about Centrify’s Identity & Access Management solutions and Zero Trust Security, visit www.centrify.com.
* Editor’s note: this blog originally appeared on the AWS Partner Network blog on July 30, 2018.
The post How to Authenticate Users Into Apps Using AWS Application Load Balancer and Centrify appeared first on Secure Thinking by Centrify.


